Installation
GENERAL INSTRUCTIONS
The final aesthetic and functional result of a building project depends largely on the careful and correct installation of panels and flashings.
Below, please find the guidelines which must be observed when installing KAMARIDIS GLOBALWIRE panels.
To begin with, all technical features and specifications of the materials to be installed, as well as their individual details must be taken into account for the application study.
Before installation, the structure of the building should be inspected, in particular the support rails for the panels. The evenness of purlins and rafters is very important for the proper fitting of the panels and should be within the limits of the corresponding European standards and regulations.
When panels need to be cut on the construction site, an electric rotary or reciprocating saw (saber saw) should be used. Wheel saws or hacksaws are unsuitable and must not be used!

After cutting, clean the panels and carefully remove burrs and filings.
The personnel working on the roof of the building should take all security measures required by European regulations.
The use of footwear with a soft and non-slippery sole is imperative.
The phenomenon of galvanic corrosion, caused by direct contact of incompatible materials with simultaneous presence of moisture, is often underestimated. Galvanic corrosion can cause the rapid oxidation of one of the materials in contact. To avoid this phenomenon, a thin PVC film should be placed between the materials.
At the end of each workday, it is important to clean the surface of the panels on the roof. Remove all unused items such as screws, washers, and any metallic elements, which can cause corrosion, oxidation, stains, etc.
INSTALLATION
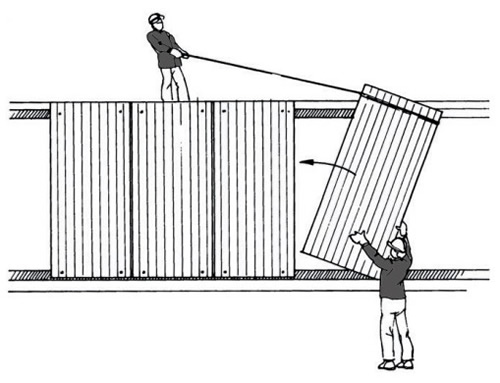
The roof and wall panels should be lined up and then securely fastened to the building structure with self-drilling screws.
The number of fixing points depends on the location of the panels on the building and the projected stress loads.
Roof and wall panels must be installed using appropriate fastening materials.
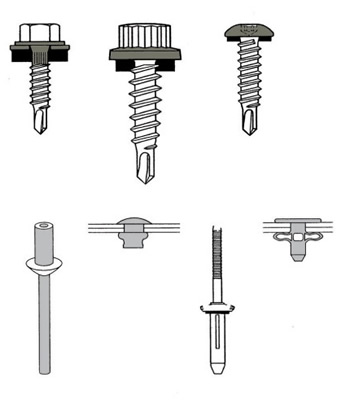
The main materials for fastening panels to the building structure are self-drilling screws with two different threads, one at the bottom and one at the top.
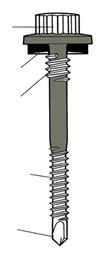
These screws are specifically designed to penetrate the panels and fix them securely to the frame of the building, while at the same time sealing them at their point of contact with the external steel sheet without the need for additional tools and previous drilling of the metal frame.
The drilling ability of the screw is proportional to the thickness of the metal which needs to be drilled.
For a metal thickness of 1.2 mm to 5 mm, the drilling ability is 6.
For a metal thickness of 5 mm to 12 mm, the drilling ability is 12.
Secondary fixing materials are self-drilling screws with one thread and varying heads depending on use, as well as rivets
These are used between overlapping panels, to attach flashings to panels and to attach flashings to each other.
Suitable tools such as electric drills and screw guns should be used for the drilling and fastening of materials.
The correct clamping force of self drilling screws and the correct compression of the rubber washer so that it seals and does not deform the panel surface is important to ensure water and air-tightness of drilling and anchorage points.
Insotherm RPU can be mounted on roofs with purlins made of steel, wood and reinforced concrete with embedded metal profiles.
The minimum widths of support purlins are ≥ 60 mm for intermediate and ≥ 40 mm for end purlins.
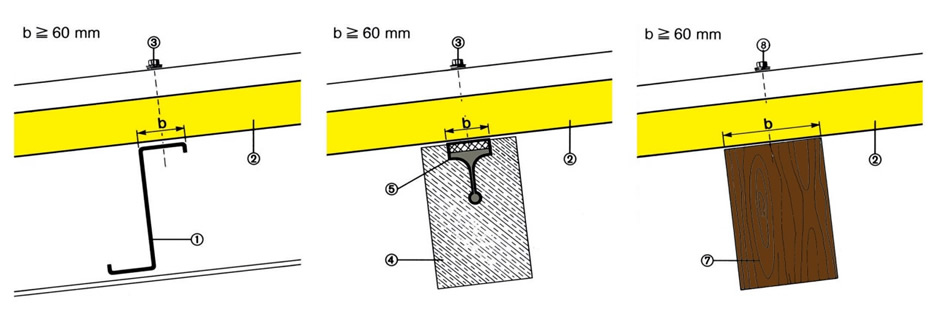
For maximum allowed spans please consult the load tables in the corresponding section.
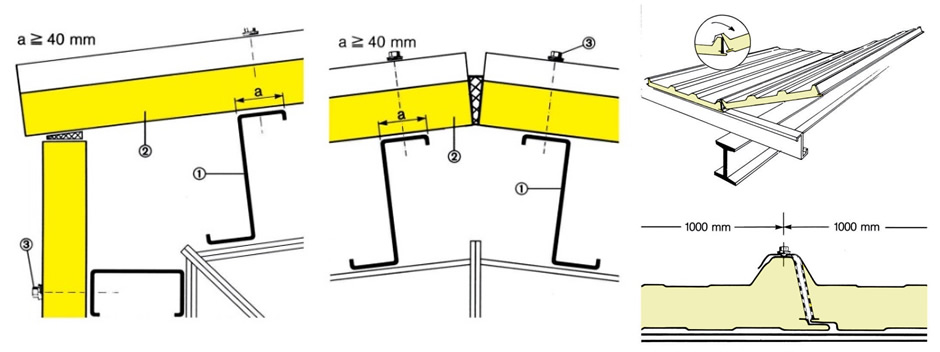
The minimum allowed roof inclination is ≥ 5° (8,8%) for panels without joint per length and ≥ 7 ° (12,3%) for panels with joint per length.
During installation, the prevailing wind direction in the area should be taken into account. The mounting direction should be opposite to the wind direction.
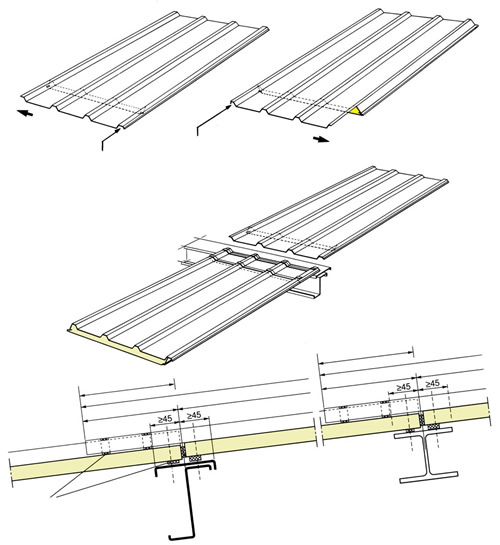
In cases where wide roof surfaces need to be covered (roof side > 16m) and there is a need to join panels, Insotherm RPU are produced with an "overlap" at one end. The upper trapezoidal steel sheet is greater in length than the lower steel sheet and without insulation. When joined, one trapezoidal steel sheet covers and seals the other, using a special film.
The length of the overlap ranges from 150 mm to 300 mm depending on the roof inclination.
The standard is 200 mm.
There are two types of panels with overlap:
Right=D and Left = L.
Looking at the panel from the overlapping side, if the overlapping rib is visible on the right side then the panel is considered RIGHT and if it is visible on the left then the panel is considered LEFT.
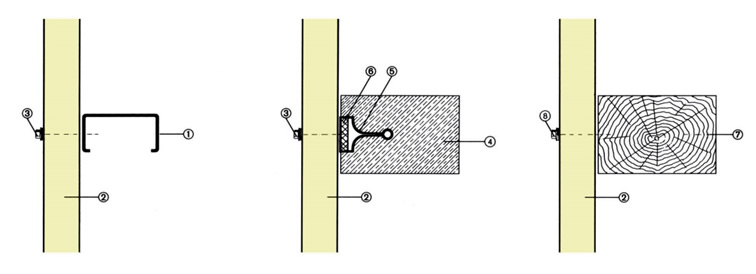
Insotherm WPU can be mounted on sides with side rails made of steel, wood and reinforced concrete with embedded metal profiles.
The minimum widths of support purlins are ≥ 60 mm for intermediate and ≥ 40 mm for end purlins.
Side panels can be installed vertically and horizontally.
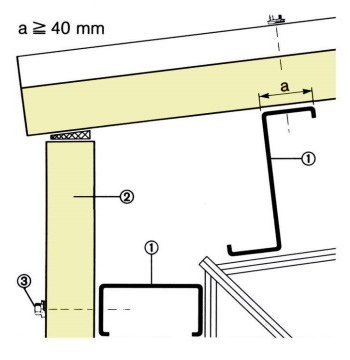
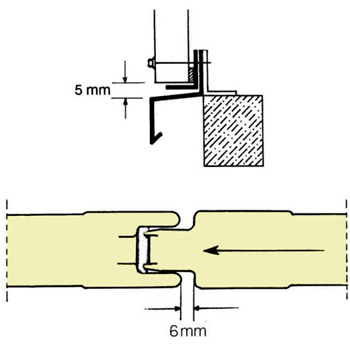
For maximum allowed spans, please consult the load tables in the corresponding section.
In vertical installations, there should be a gap of approximately 5 mm at the bottom of Insotherm WPU .
In horizontal installations, panels should be installed from the bottom upwards in order to seal their joints and to avoid the risk of water leakage.
After the first panel is installed, place the next panel into the female indentation of the first and press for a correct fit, leaving a space of approximately 6-8 mm.
The mounting direction of Insotherm WPU should be the same as the direction of the prevailing wind in the area. In contrast, the mounting direction of Insotherm SFPU should be opposite to the wind direction, so that their joints are not exposed.
